
Jenkins 설치부터 파이프라인 배포 자동화 구성까지
들어가며
2018년, 첫 입사 후 2년 차가 되던 해에 CI/CD 배포 환경을 구축하는 업무를 맡게 되었다.
당시 Jenkins Pipeline은 2016년에 정식 출시된 이후 이미 안정화되어 많은 기업에서 도입하고 있었다. 우리 팀도 수동 배포의 위험성과 비효율성을 개선하기 위해 Jenkins Pipeline을 도입하기로 결정했다.
이 글에서는 Jenkins가 무엇인지부터 시작하여, Linux 환경에서의 설치, 그리고 실제 운영에서 사용한 멀티 환경(DEV, PROD) 배포 파이프라인까지 단계별로 정리한다.
Jenkins란?
- 소프트웨어 개발 시 지속적 통합(CI) 서비스를 제공하는 오픈소스 자동화 도구
- 다수의 개발자가 하나의 프로그램을 개발할 때 버전 충돌을 방지하고 지속적인 통합이 가능하도록 지원
- MIT 라이선스를 따르는 무료 도구
- 공식 사이트: https://www.jenkins.io/
Jenkins 설치하기
설치 전 준비사항
- 운영체제: CentOS 7 기준 (다른 Linux 배포판도 유사)
- Java: Java 8 필요 (Jenkins 2.121.1 기준)
jenkins.war 파일을 이용한 설치
장점:
- 직관적이고 간단한 구성
- Linux 명령어에 익숙하지 않아도 설치 가능
- 설정 변경이 용이
1. Jenkins WAR 파일 다운로드
공식 사이트에서 안정화 버전 다운로드: https://get.jenkins.io/war-stable/
CentOS에서 다운로드:
# 다운받고자 하는 경로로 이동
cd /engn001/aks001/jenkins

# Jenkins WAR 파일 다운로드 (2018년 6월 기준 LTS 버전)
wget https://get.jenkins.io/war-stable/2.121.1/jenkins.war
2. Jenkins 실행
기본 실행 명령어:
# Java 환경 변수가 설정되어 있어야 함
java -jar jenkins.war
운영 환경을 위한 실행 스크립트:
# Jenkins 시작 스크립트 작성
vi startJenkins.sh
startJenkins.sh 내용:
#!/bin/bash

# Jenkins Home 디렉토리 설정 (필요시)
# export JENKINS_HOME=/engn001/aks001/jenkins

# Jenkins 백그라운드 실행
nohup /usr/java8_64/bin/java \
  -server \
  -Xmx1024m \
  -Dhudson.util.ProcessTree.disable=true \
  -jar /engn001/aks001/jenkins/jenkins.war \
  -Dciserv=jenkins \
  --httpPort=7070 \
  > /logs001/jenkins/jenkins.log 2>&1 &

echo "Jenkins started on port 7070"
매개변수 설명:
nohup: 백그라운드 실행-Xmx1024m: 최대 힙 메모리 1GB 설정-Dhudson.util.ProcessTree.disable=true: 프로세스 트리 비활성화--httpPort=7070: 서비스 포트 (기본값은 8080)> /logs001/jenkins/jenkins.log: 로그 파일 경로
Jenkins 중지 스크립트:
# Jenkins 중지 스크립트 작성
vi stopJenkins.sh
stopJenkins.sh 내용:
#!/bin/bash

ps -eaf | grep jenkins | grep java | awk '{print $2}' | xargs kill -9

echo "Jenkins stopped"
스크립트 실행 권한 부여 및 Jenkins 시작:
# 실행 권한 부여
chmod +x startJenkins.sh stopJenkins.sh

# Jenkins 시작
./startJenkins.sh

# 로그 확인
tail -f /logs001/jenkins/jenkins.log
Jenkins 초기 설정
1. 웹 인터페이스 접속
브라우저에서 http://서버IP:7070 접속
2. 초기 관리자 비밀번호 확인
최초 접속 시 관리자 비밀번호를 입력해야 한다.
# WAR 파일로 설치한 경우 (JENKINS_HOME 환경 변수 설정 필요)
cat $JENKINS_HOME/secrets/initialAdminPassword

# 또는 직접 경로 지정
cat ~/.jenkins/secrets/initialAdminPassword
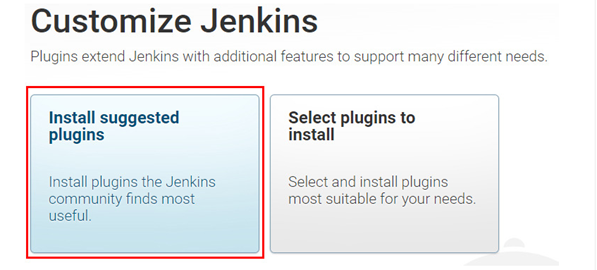
3. 플러그인 설치
Customize Jenkins 화면에서 Install suggested plugins 선택
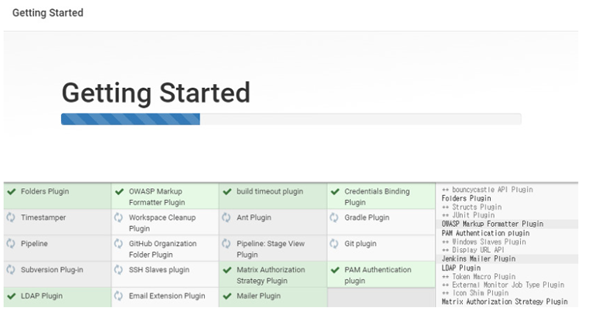
Getting Started 화면이 나타나고 자동으로 설치 진행
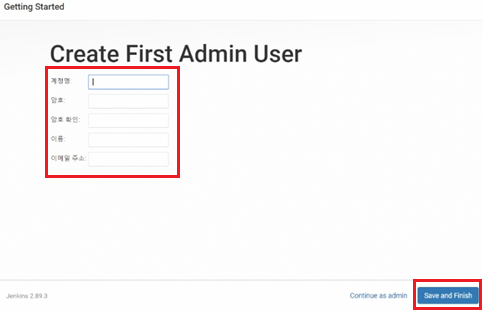
4. 관리자 계정 생성
설치 완료 후 관리자 계정 생성 화면에서 정보 입력
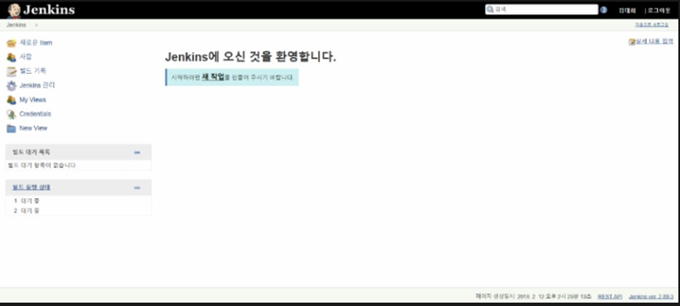
5. 설치 완료
Jenkins 메인 대시보드 화면이 나타나면 설치 완료
Jenkins 파이프라인 이해하기
파이프라인이란?
여러 빌드 에이전트에 걸쳐 있을 수 있는 장기 실행 활동을 효율적으로 관리하는 Jenkins의 핵심 기능이다.
복잡한 빌드/배포 프로세스나 여러 환경(DEV, STAGING, PROD)을 관리해야 하는 경우, 자유형(Freestyle) 작업보다 파이프라인이 훨씬 적합하다.
파이프라인 종류
파이프라인은 Groovy 코드 기반으로 작성되며, 크게 두 가지 스타일이 있다:
1. 선언형 파이프라인 (Declarative Pipeline)
- 구조화되고 읽기 쉬운 문법
- 초보자도 쉽게 작성 가능
- 현재 권장되는 방식
pipeline {
    agent any
    stages {
        stage('Build') {
            steps {
                echo 'Building...'
            }
        }
    }
}
2. 스크립트형 파이프라인 (Scripted Pipeline)
- 더 유연하지만 복잡한 문법
- Groovy의 모든 기능 활용 가능
- 고급 사용자를 위한 방식
node {
    stage('Build') {
        echo 'Building...'
    }
}
이 글에서는 선언형 파이프라인을 기준으로 설명한다.
파이프라인 Item 생성하기
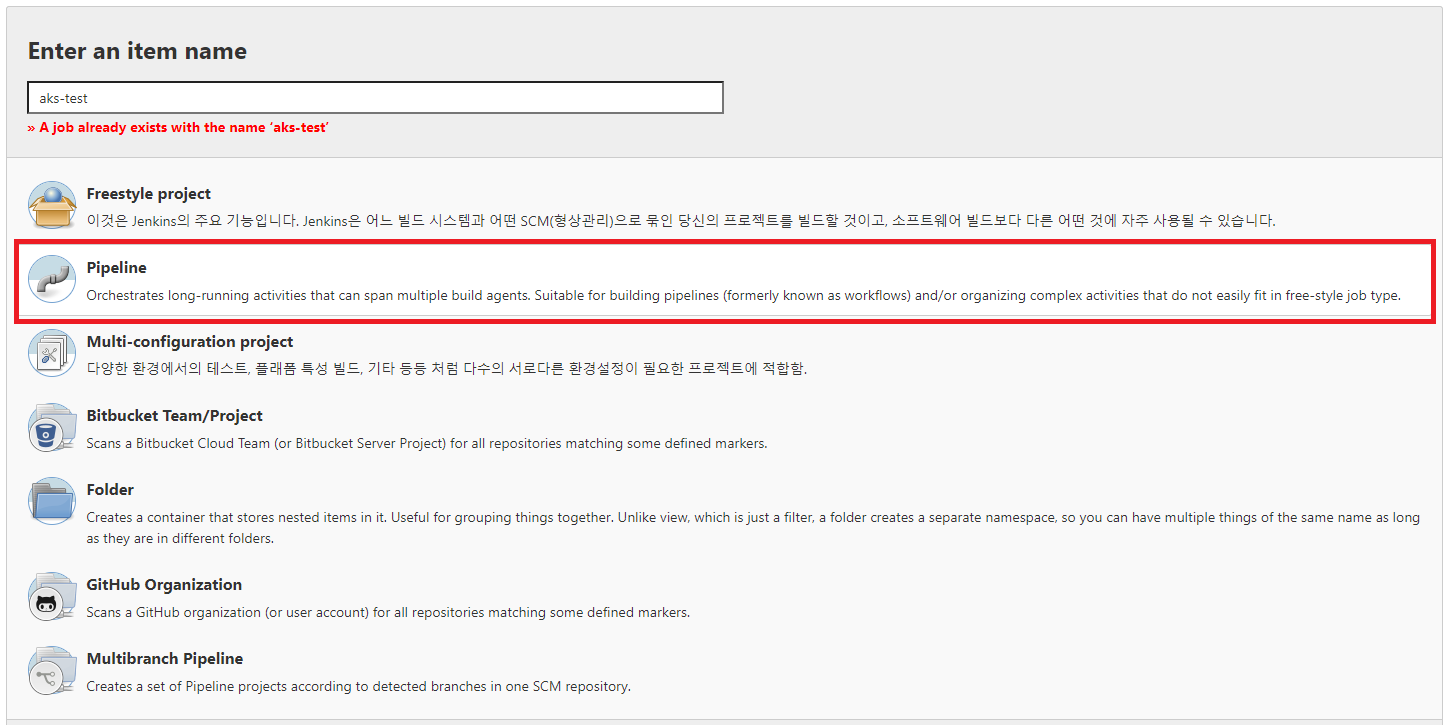
1. 새 Item에서 Pipeline 선택
Jenkins 메인 화면에서 새로운 Item 클릭 후 Pipeline 선택
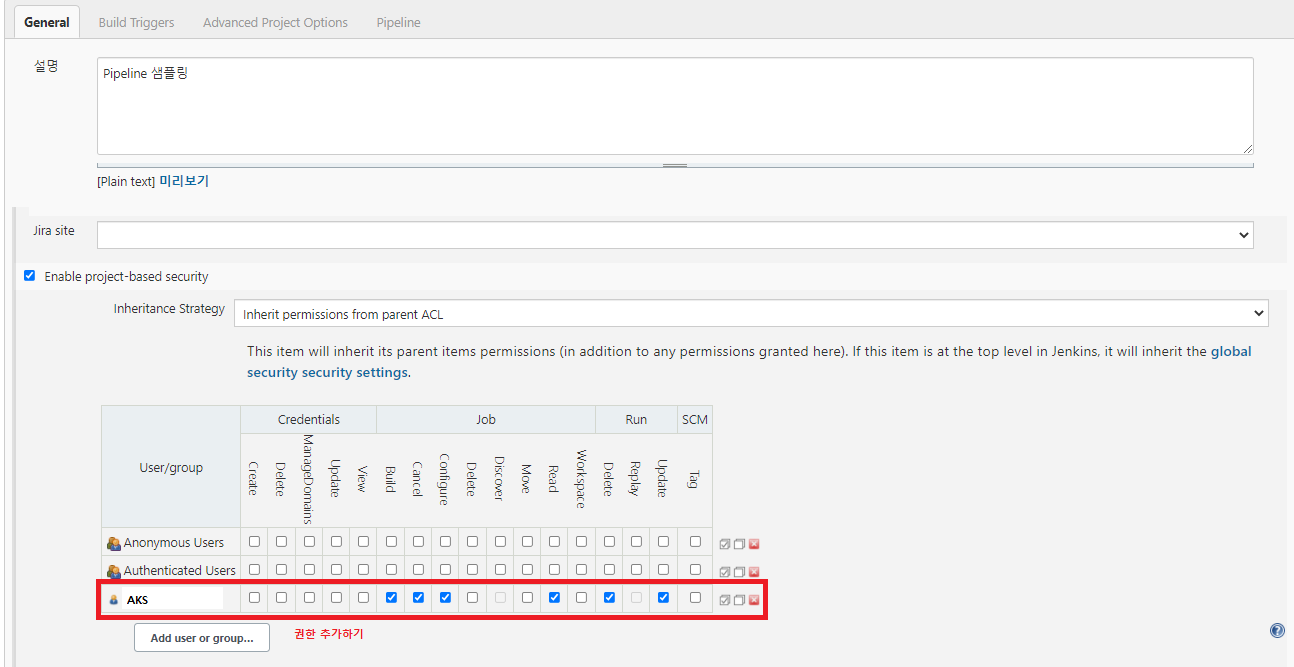
2. 권한 설정
프로젝트 기반 Matrix Authorization Strategy를 사용하는 경우, 적절한 사용자/그룹 권한 부여
3. 빌드 기록 관리
로그가 무한정 쌓이지 않도록 로그 로테이션 설정
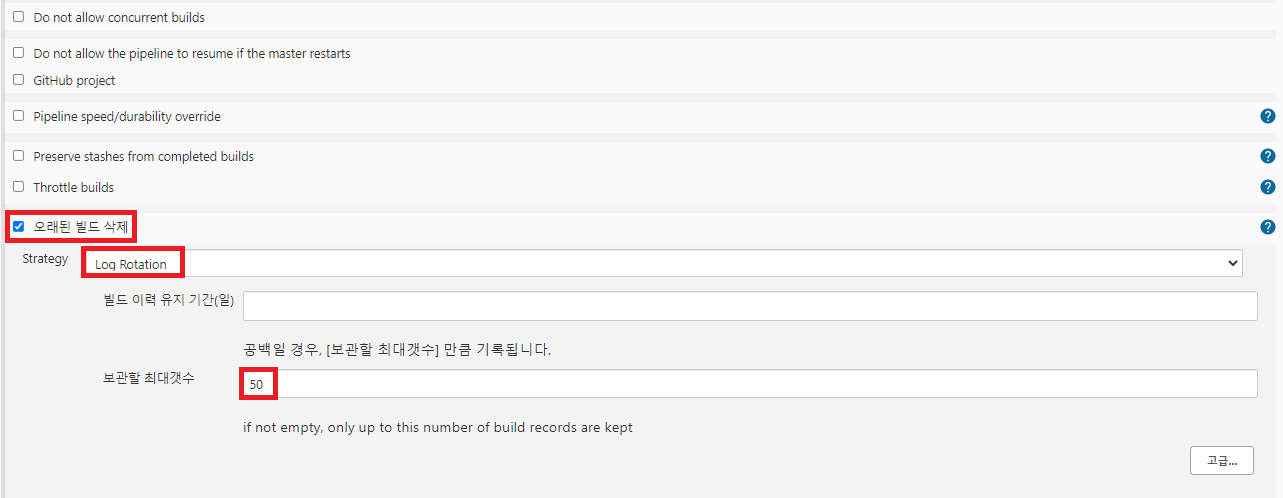
권장 설정:
- 보관할 최대 빌드 수: 30
- 보관 기간(일): 14
4. 매개변수 설정
환경별 배포를 위한 파라미터 추가
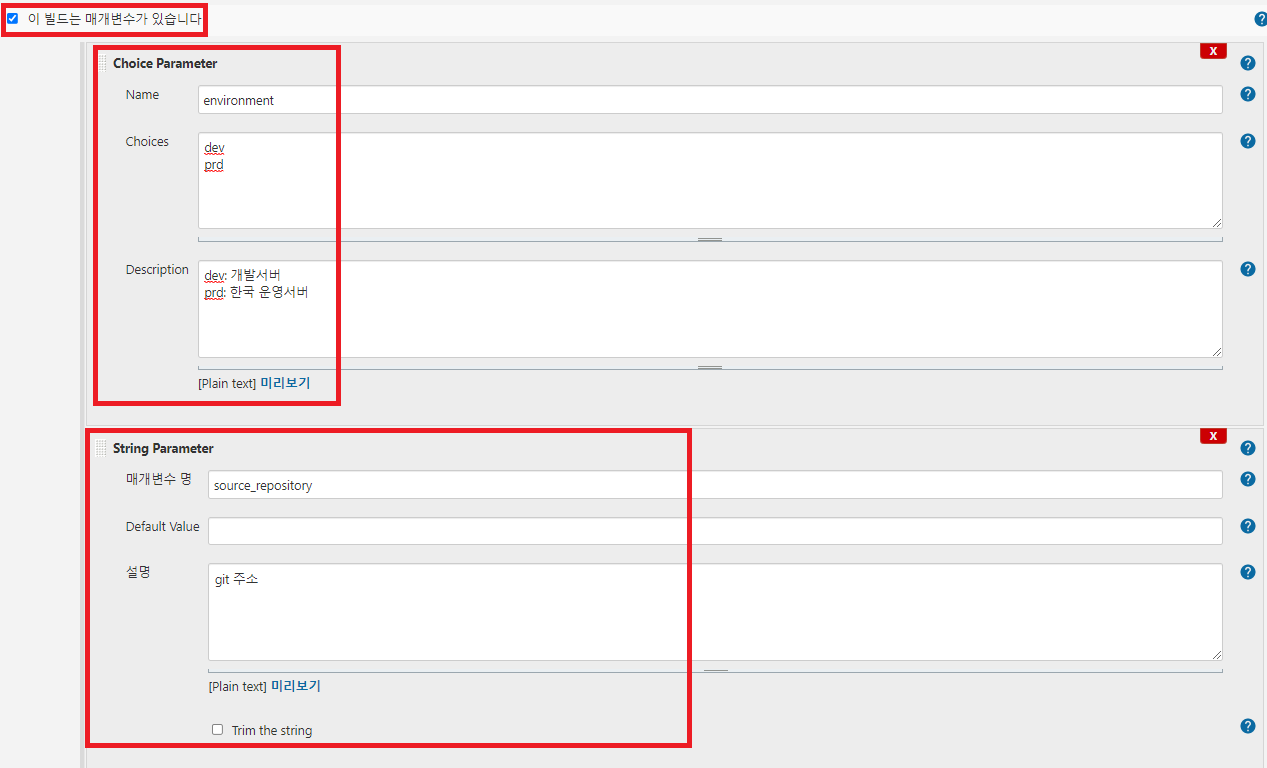
주요 파라미터 예시:
environment: Choice Parameter (dev, prod)source_repository: Git 저장소 URLssh_port: SSH 포트 번호ssh_user: 배포 대상 서버 사용자remote_path: 배포 경로war_file: 빌드 결과물 파일명
5. 파이프라인 스크립트 작성
Pipeline 섹션에서 Pipeline script 또는 Pipeline script from SCM 선택 후 스크립트 작성
실전 파이프라인 구조
전체 파이프라인 개요
pipeline {
    agent any
    options {
        timeout(time: 30, unit: 'MINUTES')
    }
    stages {
        stage('[SET]') {
            // 환경 변수 초기화
        }
        stage('[DEV]') {
            when { expression { "${params.environment}" == "dev" } }
            // DEV 환경 빌드/배포
        }
        stage('[PROD]') {
            when { expression { "${params.environment}" == "prod" } }
            // PROD 환경 빌드/배포
        }
    }
}
주요 함수 설명
1. setProperties() - 환경별 설정 초기화
void setProperties() {
    def infos

    if ("${params.environment}" == "prod") {
        infos = "${params.prod_info}".tokenize(',')
    } else {
        infos = "${params.dev_info}".tokenize(',')
    }

    env.BRANCH = "${infos[0]}"
    env.IPS = "${infos[1]}"
}
역할: 선택된 환경에 따라 브랜치명, 배포 대상 IP 등을 동적으로 설정
2. checkoutBranch() - Git 체크아웃
void checkoutBranch() {
    checkout([
        $class: 'GitSCM',
        branches: [[name: "*/${env.BRANCH}"]],
        doGenerateSubmoduleConfigurations: false,
        extensions: [[$class: "PruneStaleBranch"]],
        submoduleCfg: [],
        userRemoteConfigs: [[
            url: "${params.source_repository}",
            credentialsId: 'git-credentials' // Jenkins에 등록된 Git 인증 정보
        ]]
    ])
}
역할: 환경별 브랜치에서 소스 코드 체크아웃
3. preBuild() - 빌드 전 준비
void preBuild() {
    // Maven settings.xml 설정 (Nexus 또는 사내 Repository 사용 시)
    configFileProvider([configFile(fileId: 'maven-settings', variable: 'MAVEN_SETTINGS')]) {
        sh "cp $MAVEN_SETTINGS ~/.m2/settings.xml"
    }

    // 또는 특정 라이브러리를 사내 저장소에서 다운로드
    sh '''
        # 사내 Maven Repository에서 필요한 라이브러리 다운로드 예시
        # curl -O http://nexus.company.com/repository/libs/common-lib-1.0.0.jar
    '''
}
역할: Maven 설정 및 사내 Repository에서 프라이빗 의존성 동기화
참고: Nexus, Artifactory 등 사내 Repository를 사용하는 경우
settings.xml에 Repository URL을 설정하여 사용
4. mvnBuild() - Maven 빌드
void mvnBuild() {
    sh "/usr/local/src/apache-maven/bin/mvn -f pomw.xml clean package"
}
역할: Maven을 사용하여 WAR 파일 생성
5. deploy() - 원격 서버 배포
void deploy() {
    for(remoteIp in env.IPS.tokenize('|')) {
        def remote = [:]
        remote.name = "target-server"
        remote.host = "${remoteIp}"
        remote.port = "${params.ssh_port}" as int
        remote.user = "${params.ssh_user}"
        remote.allowAnyHosts = true

        withCredentials([sshUserPrivateKey(credentialsId: 'ssh_jenkins', keyFileVariable: 'KEY')]) {
            remote.identityFile = KEY

            // WAR 파일 업로드 및 압축 해제
            sshCommand remote: remote, command: "mkdir -p ${params.remote_path}"
            sshPut remote: remote, from: "target/${params.war_file}", into: "${params.remote_path}/${params.war_file}"
            sshCommand remote: remote, command: "cd ${params.remote_path} && jar xvf ${params.war_file} > /dev/null"
            sshCommand remote: remote, command: "rm ${params.remote_path}/${params.war_file}"

            // 배포 스크립트 업로드 및 실행
            sshPut remote: remote, from: "build/${params.deploy_script_file}", into: "${params.remote_path}/${params.deploy_script_file}"
            sshCommand remote: remote, command: "chmod 775 ${params.remote_path}/${params.deploy_script_file}"
            sshCommand remote: remote, command: "${params.remote_path}/${params.deploy_script_file}"
        }
    }
}
역할: SSH를 통해 여러 서버에 동시 배포 (Blue-Green, Rolling 배포 스크립트 실행)
전체 파이프라인 코드
pipeline {
    agent any
    options {
        timeout(time: 30, unit: 'MINUTES')
    }
    stages {
        stage('[SET]') {
            stages {
                stage('[SET] Properties') {
                    steps {
                        setProperties()
                    }
                }
            }
        }
        stage('[DEV]') {
            when { expression { "${params.environment}" == "dev" } }
            stages {
                stage('[DEV] Checkout') {
                    steps {
                        checkoutBranch()
                    }
                }
                stage('[DEV] Build') {
                    steps {
                        preBuild()
                        mvnBuild()
                        postBuild()
                    }
                }
                stage('[DEV] Deploy') {
                    steps {
                        preDeploy()
                        deploy()
                        postDeploy()
                    }
                }
            }
        }
        stage('[PROD]') {
            when { expression { "${params.environment}" == "prod" } }
            stages {
                stage('[PROD] Checkout') {
                    steps {
                        checkoutBranch()
                    }
                }
                stage('[PROD] Build') {
                    steps {
                        preBuild()
                        mvnBuild()
                        postBuild()
                    }
                }
                stage('[PROD] Deploy') {
                    steps {
                        preDeploy()
                        deploy()
                        postDeploy()
                    }
                }
            }
        }
    }
}

// 환경별 설정 초기화
void setProperties() {
    def infos

    if ("${params.environment}" == "prod") {
        infos = "${params.prod_info}".tokenize(',')
    } else {
        infos = "${params.dev_info}".tokenize(',')
    }

    env.BRANCH = "${infos[0]}"
    env.IPS = "${infos[1]}"
}

// 소스 체크아웃
void checkoutBranch() {
    checkout([
        $class: 'GitSCM',
        branches: [[name: "*/${env.BRANCH}"]],
        doGenerateSubmoduleConfigurations: false,
        extensions: [[$class: "PruneStaleBranch"]],
        submoduleCfg: [],
        userRemoteConfigs: [[
            url: "${params.source_repository}",
            credentialsId: 'git-credentials'
        ]]
    ])
}

// 빌드 전 처리
void preBuild() {
    // Maven settings.xml 복사 (Jenkins에 등록된 Config File 사용)
    configFileProvider([configFile(fileId: 'maven-settings', variable: 'MAVEN_SETTINGS')]) {
        sh "cp $MAVEN_SETTINGS ~/.m2/settings.xml"
    }

    // 또는 직접 라이브러리를 복사하는 경우
    sh '''
        # 사내 공유 디렉토리에서 필요한 라이브러리 복사
        # cp /shared/maven-libs/com/company/*.jar ~/.m2/repository/com/company/
        # cp /shared/maven-libs/devonframe/*.jar ~/.m2/repository/devonframe/
    '''
}

// Maven 빌드
void mvnBuild() {
    sh "/usr/local/src/apache-maven/bin/mvn -f pomw.xml clean package"
}

// 빌드 후 처리
void postBuild() {
    echo "Build completed successfully"
}

// 배포 전 처리
void preDeploy() {
    // 사내 저장소나 공유 디렉토리에서 공통 라이브러리 복사
    sh '''
        # Nexus Repository에서 다운로드
        curl -u nexus-user:password -O http://nexus.company.com/repository/libs/common-lib-1.0.0.jar

        # 또는 공유 디렉토리에서 복사
        # cp /shared/libs/common-lib-1.0.0.jar .
    '''
}

// 배포
void deploy() {
    for(remoteIp in env.IPS.tokenize('|')) {
        def remote = [:]
        remote.name = "target-server"
        remote.host = "${remoteIp}"
        remote.port = "${params.ssh_port}" as int
        remote.user = "${params.ssh_user}"
        remote.allowAnyHosts = true

        withCredentials([sshUserPrivateKey(credentialsId: 'ssh_jenkins', keyFileVariable: 'KEY')]) {
            remote.identityFile = KEY

            // WAR 파일 업로드
            sshCommand remote: remote, command: "mkdir -p ${params.remote_path}"
            sshPut remote: remote, from: "target/${params.war_file}", into: "${params.remote_path}/${params.war_file}"
            sshCommand remote: remote, command: "cd ${params.remote_path} && jar xvf ${params.war_file} > /dev/null"
            sshCommand remote: remote, command: "rm ${params.remote_path}/${params.war_file}"

            // 배포 스크립트 실행
            sshPut remote: remote, from: "build/${params.deploy_script_file}", into: "${params.remote_path}/${params.deploy_script_file}"
            sshCommand remote: remote, command: "chmod 775 ${params.remote_path}/${params.deploy_script_file}"
            sshCommand remote: remote, command: "${params.remote_path}/${params.deploy_script_file}"
        }
    }
}

// 배포 후 처리
void postDeploy() {
    sh "rm -f common-lib-1.0.0.jar"
}
실전 활용 팁
1. when 조건으로 환경 분리
when { expression { "${params.environment}" == "prod" } }
매개변수 값에 따라 특정 stage만 실행되도록 제어
2. 병렬 배포
여러 서버에 동시 배포가 필요한 경우:
stage('Deploy') {
    parallel {
        stage('Server-1') {
            steps { deployToServer('10.0.1.1') }
        }
        stage('Server-2') {
            steps { deployToServer('10.0.1.2') }
        }
    }
}
3. 배포 승인 단계 추가
운영 환경 배포 전 수동 승인:
stage('Approval') {
    when { expression { "${params.environment}" == "prod" } }
    steps {
        input message: 'Deploy to Production?', ok: 'Deploy'
    }
}
4. Slack 알림 통합
post {
    success {
        slackSend color: 'good', message: "Deployment Success: ${env.JOB_NAME} #${env.BUILD_NUMBER}"
    }
    failure {
        slackSend color: 'danger', message: "Deployment Failed: ${env.JOB_NAME} #${env.BUILD_NUMBER}"
    }
}
댓글남기기